

Custom WeekView with Jetpack Compose

Search for a command to run...
No comments yet. Be the first to comment.
I had problems like when we switch branches, UI files like drawables, icons, xml files etc gets in android studio and caches and even after doing basic invalidate caches restart etc it didnt worked, so after compiling all steps leds to soltion , here...

In today's discussion, we delve into implementing bottom navigation in Jetpack Compose, which can be particularly challenging when combined with nested navigation. While several methods are available, developers often encounter difficulties with navi...

A Clean Architecture Guide for Building Modern Android Apps

Master NavController, NavHost, and More

Introduction LangChain is an open-source framework for developing applications powered by large language models (LLMs). It provides a high-level API that makes it easy to chain together multiple LLMs, as well as other data sources and tools, to creat...

In this blog post, we will learn how to create a custom week view using Jetpack Compose in Android. Jetpack Compose is a modern toolkit for building native Android UI. It simplifies and accelerates UI development on Android with less code, powerful tools, and intuitive Kotlin APIs.
Before we start, make sure you have the latest version of Android Studio installed.
Open Android Studio and create a new project. Choose the "Empty Compose Activity" template. Name the project "CustomWeekView".
In the build.gradle file of your app module, add the following dependencies:
dependencies {
    implementation("androidx.core:core-ktx:1.9.0")
    implementation("androidx.lifecycle:lifecycle-runtime-ktx:2.6.1")
    implementation("androidx.activity:activity-compose:1.7.0")
    implementation(platform("androidx.compose:compose-bom:2023.03.00"))
    implementation("androidx.compose.ui:ui")
    implementation("androidx.compose.ui:ui-graphics")
    implementation("androidx.compose.ui:ui-tooling-preview")
    implementation("androidx.compose.material3:material3")
    testImplementation("junit:junit:4.13.2")
    androidTestImplementation("androidx.test.ext:junit:1.1.5")
    androidTestImplementation("androidx.test.espresso:espresso-core:3.5.1")
    androidTestImplementation(platform("androidx.compose:compose-bom:2023.03.00"))
    androidTestImplementation("androidx.compose.ui:ui-test-junit4")
    debugImplementation("androidx.compose.ui:ui-tooling")
    debugImplementation("androidx.compose.ui:ui-test-manifest")
    implementation("com.jakewharton.threetenabp:threetenabp:1.3.1")
}
In project level build.gradle
plugins {
    id("com.android.application") version "8.1.0" apply false
    id("org.jetbrains.kotlin.android") version "1.8.10" apply false
}
Structure:
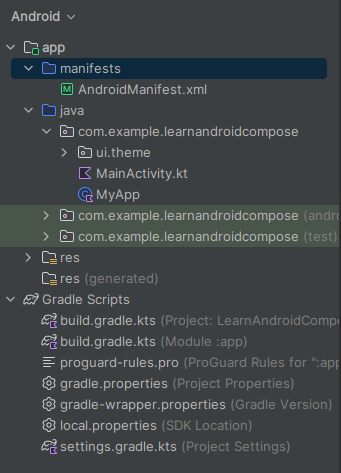
We will be using the ThreeTenABP library for date and time handling. Initialize it in your custom Application class:
class MyApp : Application() {
    override fun onCreate() {
        super.onCreate()
        AndroidThreeTen.init(this)
    }
}
And declare it in your AndroidManifest.xml:
<application
    android:allowBackup="true"
    android:name=".MyApp"
    android:dataExtractionRules="@xml/data_extraction_rules"
    android:fullBackupContent="@xml/backup_rules"
    android:icon="@mipmap/ic_launcher"
    android:label="@string/app_name"
    android:roundIcon="@mipmap/ic_launcher_round"
    android:supportsRtl="true"
    android:theme="@style/Theme.LearnAndroidCompose"
    tools:targetApi="31">
    <activity
        android:name=".MainActivity"
        android:exported="true"
        android:label="@string/app_name"
        android:theme="@style/Theme.LearnAndroidCompose">
        <intent-filter>
            <action android:name="android.intent.action.MAIN" />
            <category android:name="android.intent.category.LAUNCHER" />
        </intent-filter>
    </activity>
</application>
In this part, we will start building our custom week view. We will create a CalendarView composable function that will display the week view.
In your MainActivity, set the content to our CalendarView composable. We will pass a selectedDate state to it, which will be updated when a date is clicked.
class MainActivity : ComponentActivity() {
    override fun onCreate(savedInstanceState: Bundle?) {
        super.onCreate(savedInstanceState)
        setContent {
            LearnAndroidComposeTheme {
                var selectedDate = remember { mutableStateOf(LocalDate.now()) }
                // A surface container using the 'background' color from the theme
                Surface(modifier = Modifier.fillMaxSize(), color = MaterialTheme.colorScheme.background) {
                    CalendarView(selectedDate = selectedDate)
                }
            }
        }
    }
}
In your CalendarView composable, we will display the selected date and the week view. We will use a HorizontalPager to allow the user to swipe through weeks.
@OptIn(ExperimentalMaterial3Api::class, ExperimentalFoundationApi::class)
@Composable
fun CalendarView(selectedDate: MutableState<LocalDate>) {
    val today = LocalDate.now()
    Log.e("TAG", "CalendarView: $today")

    val weeks = getWeeksFromToday(today, 52)

    val pagerState = rememberPagerState(
        initialPage = 0,
        initialPageOffsetFraction = 0f
    )

    Column(modifier = Modifier.fillMaxWidth()) {
        // Display the selected date and week view here...
    }
}
Inside your CalendarView composable, add a Text composable to display the selected date. We will format the date based on whether it is today, tomorrow, or another day.
val displayText = when {
    selectedDate.value == today -> "Today"
    selectedDate.value == today.plusDays(1) -> "Tomorrow"
    else -> {
        val dateFormat = if (selectedDate.value.year == today.year) {
            DateTimeFormatter.ofPattern("d MMM", Locale.getDefault())
        } else {
            DateTimeFormatter.ofPattern("d MMM yyyy", Locale.getDefault())
        }
        selectedDate.value.format(dateFormat)
    }
}

Text(
    text = displayText,
    style = MaterialTheme.typography.headlineLarge.copy( fontWeight = FontWeight.Bold),
    color = MaterialTheme.colorScheme.primary,
    modifier = Modifier.padding(start = 16.dp, end = 16.dp, top = 16.dp, bottom = 8.dp)
)
Next, add a HorizontalPager to display the week view. Inside the HorizontalPager, create a Row for each week and a Box for each date. When a date is clicked, update the selectedDate state.
HorizontalPager(    pageCount = weeks.size,
    state = pagerState, modifier = Modifier.fillMaxWidth()) { page ->
    val weekDates = weeks[page]

    Row(
        modifier = Modifier
            .fillMaxWidth()
            .padding(horizontal = 8.dp)  // Add horizontal padding
    ) {
        weekDates.forEach { date ->
            val interactionSource = remember { MutableInteractionSource() }
            Box(
                modifier = Modifier
                    .weight(1f)
                    .height(48.dp)  // Add a fixed height
                    .clip(CircleShape)
                    .clickable(
                    ) { selectedDate.value = date },

                contentAlignment = Alignment.Center
            ) {
                Text(
                    text = date.dayOfMonth.toString(),
                    textAlign = TextAlign.Center
                )
            }
        }
    }
}
In this part, we will enhance our week view by adding day names and handling date selection.
Before the HorizontalPager in your CalendarView composable, add a Row to display the day names.
Row(
    modifier = Modifier
        .fillMaxWidth()
        .padding(horizontal = 8.dp)
) {
    listOf("Sun", "Mon", "Tue", "Wed", "Thu", "Fri", "Sat").forEach { day ->
        Text(
            text = day,
            modifier = Modifier.weight(1f),
            textAlign = TextAlign.Center
        )
    }
}
Spacer(modifier = Modifier.height(8.dp))
In the Box for each date, change the background color based on whether the date is the selected date.
Box(
    modifier = Modifier
        .weight(1f)
        .height(48.dp)  // Add a fixed height
        .clip(CircleShape)
        .clickable(
        ) { selectedDate.value = date }
        .background(if (date == selectedDate.value) MaterialTheme.colorScheme.primaryContainer else Color.Transparent),

    contentAlignment = Alignment.Center
) {
    Text(
        text = date.dayOfMonth.toString(),
        textAlign = TextAlign.Center
    )
}
Create a function getWeeksFromToday to generate a list of weeks from today. Each week is a list of dates.
fun getWeeksFromToday(today: LocalDate, weeksCount: Int): List<List<LocalDate>> {
    val weeks = mutableListOf<List<LocalDate>>()
    var currentStartOfWeek = today
    while (currentStartOfWeek.dayOfWeek != DayOfWeek.SUNDAY) {
        currentStartOfWeek = currentStartOfWeek.minusDays(1)
    }
    repeat(weeksCount) {
        val week = (0 until 7).map { currentStartOfWeek.plusDays(it.toLong()) }
        weeks.add(week)
        currentStartOfWeek = currentStartOfWeek.plusWeeks(1)
    }
    weeks.forEach { week ->
        Log.e("TAG", "Week: ${week.joinToString(", ")}")
    }
    return weeks
}
Call this function in your CalendarView composable to generate the weeks.
val weeks = getWeeksFromToday(today, 52)
Below the displayed date, add a Text composable to display the name of the week of the selected date.
val weekName = selectedDate.value.dayOfWeek.getDisplayName(TextStyle.FULL, Locale.getDefault())
Text(
    text = weekName,
    color = MaterialTheme.colorScheme.secondary,
    style = MaterialTheme.typography.bodyMedium.copy(fontWeight = FontWeight.Light),
    modifier = Modifier.padding(start = 20.dp, bottom = 16.dp)
)
MainActivity.class:
class MainActivity : ComponentActivity() {
    override fun onCreate(savedInstanceState: Bundle?) {
        super.onCreate(savedInstanceState)
        setContent {
            LearnAndroidComposeTheme {
                var selectedDate = remember { mutableStateOf(LocalDate.now()) }
                // A surface container using the 'background' color from the theme
                Surface(modifier = Modifier.fillMaxSize(), color = MaterialTheme.colorScheme.background) {
                    CalendarView(selectedDate = selectedDate)

                }
            }
        }
    }
}

@OptIn(ExperimentalMaterial3Api::class, ExperimentalFoundationApi::class)
@Composable
fun CalendarView(selectedDate: MutableState<LocalDate>) {
    val today = LocalDate.now()
    Log.e("TAG", "CalendarView: $today")

    val weeks = getWeeksFromToday(today, 52)

    val pagerState = rememberPagerState(
        initialPage = 0,
        initialPageOffsetFraction = 0f
    )

    Column(modifier = Modifier.fillMaxWidth()) {
        val displayText = when {
            selectedDate.value == today -> "Today"
            selectedDate.value == today.plusDays(1) -> "Tomorrow"
            else -> {
                val dateFormat = if (selectedDate.value.year == today.year) {
                    DateTimeFormatter.ofPattern("d MMM", Locale.getDefault())
                } else {
                    DateTimeFormatter.ofPattern("d MMM yyyy", Locale.getDefault())
                }
                selectedDate.value.format(dateFormat)
            }
        }

        Text(
            text = displayText,
            style = MaterialTheme.typography.headlineLarge.copy( fontWeight = FontWeight.Bold),
            color = MaterialTheme.colorScheme.primary,
            modifier = Modifier.padding(start = 16.dp, end = 16.dp, top = 16.dp, bottom = 8.dp)
        )

        val weekName = selectedDate.value.dayOfWeek.getDisplayName(TextStyle.FULL, Locale.getDefault())
        Text(
            text = weekName,
            color = MaterialTheme.colorScheme.secondary,
            style = MaterialTheme.typography.bodyMedium.copy(fontWeight = FontWeight.Light),
            modifier = Modifier.padding(start = 20.dp, bottom = 16.dp)
        )

        Row(
            modifier = Modifier
                .fillMaxWidth()
                .padding(horizontal = 8.dp)
        ) {
            listOf("Sun", "Mon", "Tue", "Wed", "Thu", "Fri", "Sat").forEach { day ->
                Text(
                    text = day,
                    modifier = Modifier.weight(1f),
                    textAlign = TextAlign.Center
                )
            }
        }
        Spacer(modifier = Modifier.height(8.dp))

        HorizontalPager(    pageCount = weeks.size,
            state = pagerState, modifier = Modifier.fillMaxWidth()) { page ->
            val weekDates = weeks[page]

            Row(
                modifier = Modifier
                    .fillMaxWidth()
                    .padding(horizontal = 8.dp)  // Add horizontal padding
            ) {
                weekDates.forEach { date ->
                    val interactionSource = remember { MutableInteractionSource() }
                    Box(
                        modifier = Modifier
                            .weight(1f)
                            .height(48.dp)  // Add a fixed height
                            .clip(CircleShape)
                            .clickable(
                            ) { selectedDate.value = date }
                            .background(if (date == selectedDate.value) MaterialTheme.colorScheme.primaryContainer else Color.Transparent),

                        contentAlignment = Alignment.Center
                    ) {
                        Text(
                            text = date.dayOfMonth.toString(),
                            textAlign = TextAlign.Center
                        )
                    }
                }
            }
        }
    }
}

fun getWeeksFromToday(today: LocalDate, weeksCount: Int): List<List<LocalDate>> {
    val weeks = mutableListOf<List<LocalDate>>()
    var currentStartOfWeek = today
    while (currentStartOfWeek.dayOfWeek != DayOfWeek.SUNDAY) {
        currentStartOfWeek = currentStartOfWeek.minusDays(1)
    }
    repeat(weeksCount) {
        val week = (0 until 7).map { currentStartOfWeek.plusDays(it.toLong()) }
        weeks.add(week)
        currentStartOfWeek = currentStartOfWeek.plusWeeks(1)
    }
    weeks.forEach { week ->
        Log.e("TAG", "Week: ${week.joinToString(", ")}")
    }
    return weeks
}
Now, run your app and test the week view. You should be able to swipe through weeks and select a date. The displayed date and week name should update accordingly.
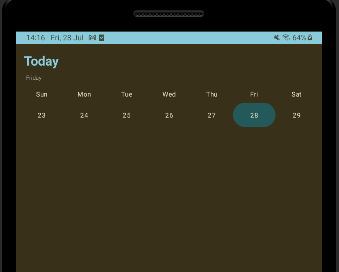
That's it! You have created a custom week view using Jetpack Compose. This is a basic implementation and there are many ways you can enhance it. For example, you can add animations when a date is selected, or you can add events to the dates.
I hope you found this tutorial helpful. Happy coding!