

Ultimate Guide to Jetpack Compose Navigation
Master NavController, NavHost, and More

Search for a command to run...
Master NavController, NavHost, and More
No comments yet. Be the first to comment.
In this series, I will update on android deveopment and kotlin, java code with all latest updates.
In today's discussion, we delve into implementing bottom navigation in Jetpack Compose, which can be particularly challenging when combined with nested navigation. While several methods are available, developers often encounter difficulties with navi...
I had problems like when we switch branches, UI files like drawables, icons, xml files etc gets in android studio and caches and even after doing basic invalidate caches restart etc it didnt worked, so after compiling all steps leds to soltion , here...

In today's discussion, we delve into implementing bottom navigation in Jetpack Compose, which can be particularly challenging when combined with nested navigation. While several methods are available, developers often encounter difficulties with navi...

A Clean Architecture Guide for Building Modern Android Apps

Introduction LangChain is an open-source framework for developing applications powered by large language models (LLMs). It provides a high-level API that makes it easy to chain together multiple LLMs, as well as other data sources and tools, to creat...

Introduction:
In the ever-evolving world of Android development, Jetpack Compose has emerged as a game-changer. It simplifies and accelerates UI development with its modern, declarative approach. Compose allows developers to build beautiful, responsive layouts with less code compared to the traditional View-based system.
Navigating between different screens is a fundamental aspect of any mobile application. In Jetpack Compose, navigation is handled through a flexible and easy-to-use system that integrates seamlessly with the rest of the Compose framework. This tutorial aims to guide you through the essentials of navigation in Jetpack Compose, from basic setups to more advanced features like passing data between screens.
Section 1: Setting Up the Environment
Before diving into navigation, it's crucial to set up your environment for Jetpack Compose. Here are the steps to get started:
Create a New Project or Update an Existing One:
If you're starting a new project, ensure you select the 'Empty Compose Activity' template in Android Studio.
For existing projects, update your build.gradle files to include the latest Compose dependencies.
Adding Navigation Dependencies:
Jetpack Compose navigation requires specific dependencies. Open your app-level build.gradle file and add the following lines in the dependencies block:
implementation "androidx.navigation:navigation-compose:2.7.5" // Use the latest version available
Sync your project after adding these dependencies to ensure they are properly integrated.
With these steps, your environment is now set up for using Jetpack Compose Navigation. In the next section, we'll start building our navigation graph and explore how to navigate between different composables.
Full Gradle Code:
Project Level Gradle:
// Top-level build file where you can add configuration options common to all sub-projects/modules.
plugins {
id 'com.android.application' version '8.1.1' apply false
    id 'org.jetbrains.kotlin.android' version '1.8.10' apply false
}
App Level Gradle:
plugins {
    id 'com.android.application'
    id 'org.jetbrains.kotlin.android'
}

android {
    namespace 'com.saurabhjadhavblogs.myapplication'
    compileSdk 34

    defaultConfig {
        applicationId "com.saurabhjadhavblogs.myapplication"
        minSdk 24
        targetSdk 34
        versionCode 1
        versionName "1.0"

        testInstrumentationRunner "androidx.test.runner.AndroidJUnitRunner"
        vectorDrawables {
            useSupportLibrary true
        }
    }

    buildTypes {
        release {
            minifyEnabled false
            proguardFiles getDefaultProguardFile('proguard-android-optimize.txt'), 'proguard-rules.pro'
        }
    }
    compileOptions {
        sourceCompatibility JavaVersion.VERSION_1_8
        targetCompatibility JavaVersion.VERSION_1_8
    }
    kotlinOptions {
        jvmTarget = '1.8'
    }
    buildFeatures {
        compose true
    }
    composeOptions {
        kotlinCompilerExtensionVersion '1.4.3'
    }
    packaging {
        resources {
            excludes += '/META-INF/{AL2.0,LGPL2.1}'
        }
    }
}

dependencies {

    implementation 'androidx.core:core-ktx:1.9.0'
    implementation 'androidx.lifecycle:lifecycle-runtime-ktx:2.6.2'
    implementation 'androidx.activity:activity-compose:1.8.0'
    implementation platform('androidx.compose:compose-bom:2023.03.00')
    implementation 'androidx.compose.ui:ui'
    implementation 'androidx.compose.ui:ui-graphics'
    implementation 'androidx.compose.ui:ui-tooling-preview'
    implementation 'androidx.compose.material3:material3'
    testImplementation 'junit:junit:4.13.2'
    androidTestImplementation 'androidx.test.ext:junit:1.1.5'
    androidTestImplementation 'androidx.test.espresso:espresso-core:3.5.1'
    androidTestImplementation platform('androidx.compose:compose-bom:2023.03.00')
    androidTestImplementation 'androidx.compose.ui:ui-test-junit4'
    debugImplementation 'androidx.compose.ui:ui-tooling'
    debugImplementation 'androidx.compose.ui:ui-test-manifest'

    //navigation
    implementation 'androidx.navigation:navigation-compose:2.7.5'

}
Section 2: Basic Navigation Setup
Navigation in Jetpack Compose revolves around two key components: NavController and NavHost. Understanding these is crucial for implementing effective navigation in your app.
NavController:
The NavController is the backbone of the navigation framework. It manages the app's navigation stack and orchestrates the swapping of content in the NavHost.
It's responsible for handling the navigation logic, such as moving between screens or back navigation.
NavHost:
The NavHost is a composable that displays the current screen based on the navigation state held by the NavController.
It defines a navigation graph, which is a collection of all possible navigation destinations in your app and how to navigate between them.
Now, let's create a simple navigation graph and build our screens:
Creating a Navigation Graph:
In your main composable function, create a NavHost and define the navigation routes:
@Composable
fun AppNavigation() {
    val navController = rememberNavController()
    NavHost(navController = navController, startDestination = "screen1") {
        composable("screen1") { Screen1(navController) }
        composable("screen2") { Screen2(navController) }
        composable("screen3") { Screen3(navController) }
    }
}
Building Screen1, Screen2, and Screen3 Composables:
Each screen is a composable function that takes NavController as a parameter. Here's an example of what Screen1 might look like:
@Composable
fun Screen1(navController: NavController) {
    Column(
        modifier = Modifier
            .fillMaxSize()
            .padding(16.dp),
        horizontalAlignment = Alignment.CenterHorizontally,
        verticalArrangement = Arrangement.Center
    ) {
        Text("This is Screen 1")
        Button(onClick = { navController.navigate("screen2") }) {
            Text("Go to Screen 2")
        }
    }
}
Similarly, create Screen2 and Screen3, each with a button to navigate to the next screen.
Navigating Between Screens:
To navigate between screens, use the navController.navigate(route) method. For example, in Screen1, the button's onClick will trigger navigation to Screen2:
Button(onClick = { navController.navigate("screen2") }) {
    Text("Go to Screen 2")
}
This setup forms the foundation of navigation in Jetpack Compose. You have a NavHost that defines the navigation graph and individual screens that can navigate between each other using the NavController. In the next section, we'll delve into more advanced navigation techniques, including how to remove screens from the navigation stack.
Section 3: Advanced Navigation - Removing Screens from the Stack
As you build more complex applications, you'll often need to control the navigation stack more precisely. This is where the popUpTo method comes into play. It allows you to modify the back stack as part of the navigation action.
Introduction to popUpTo:
The popUpTo method is used to specify how the back stack should be manipulated when navigating to a new destination.
It can be used to clear all screens up to a certain point, or even remove the current screen from the stack after navigating away.
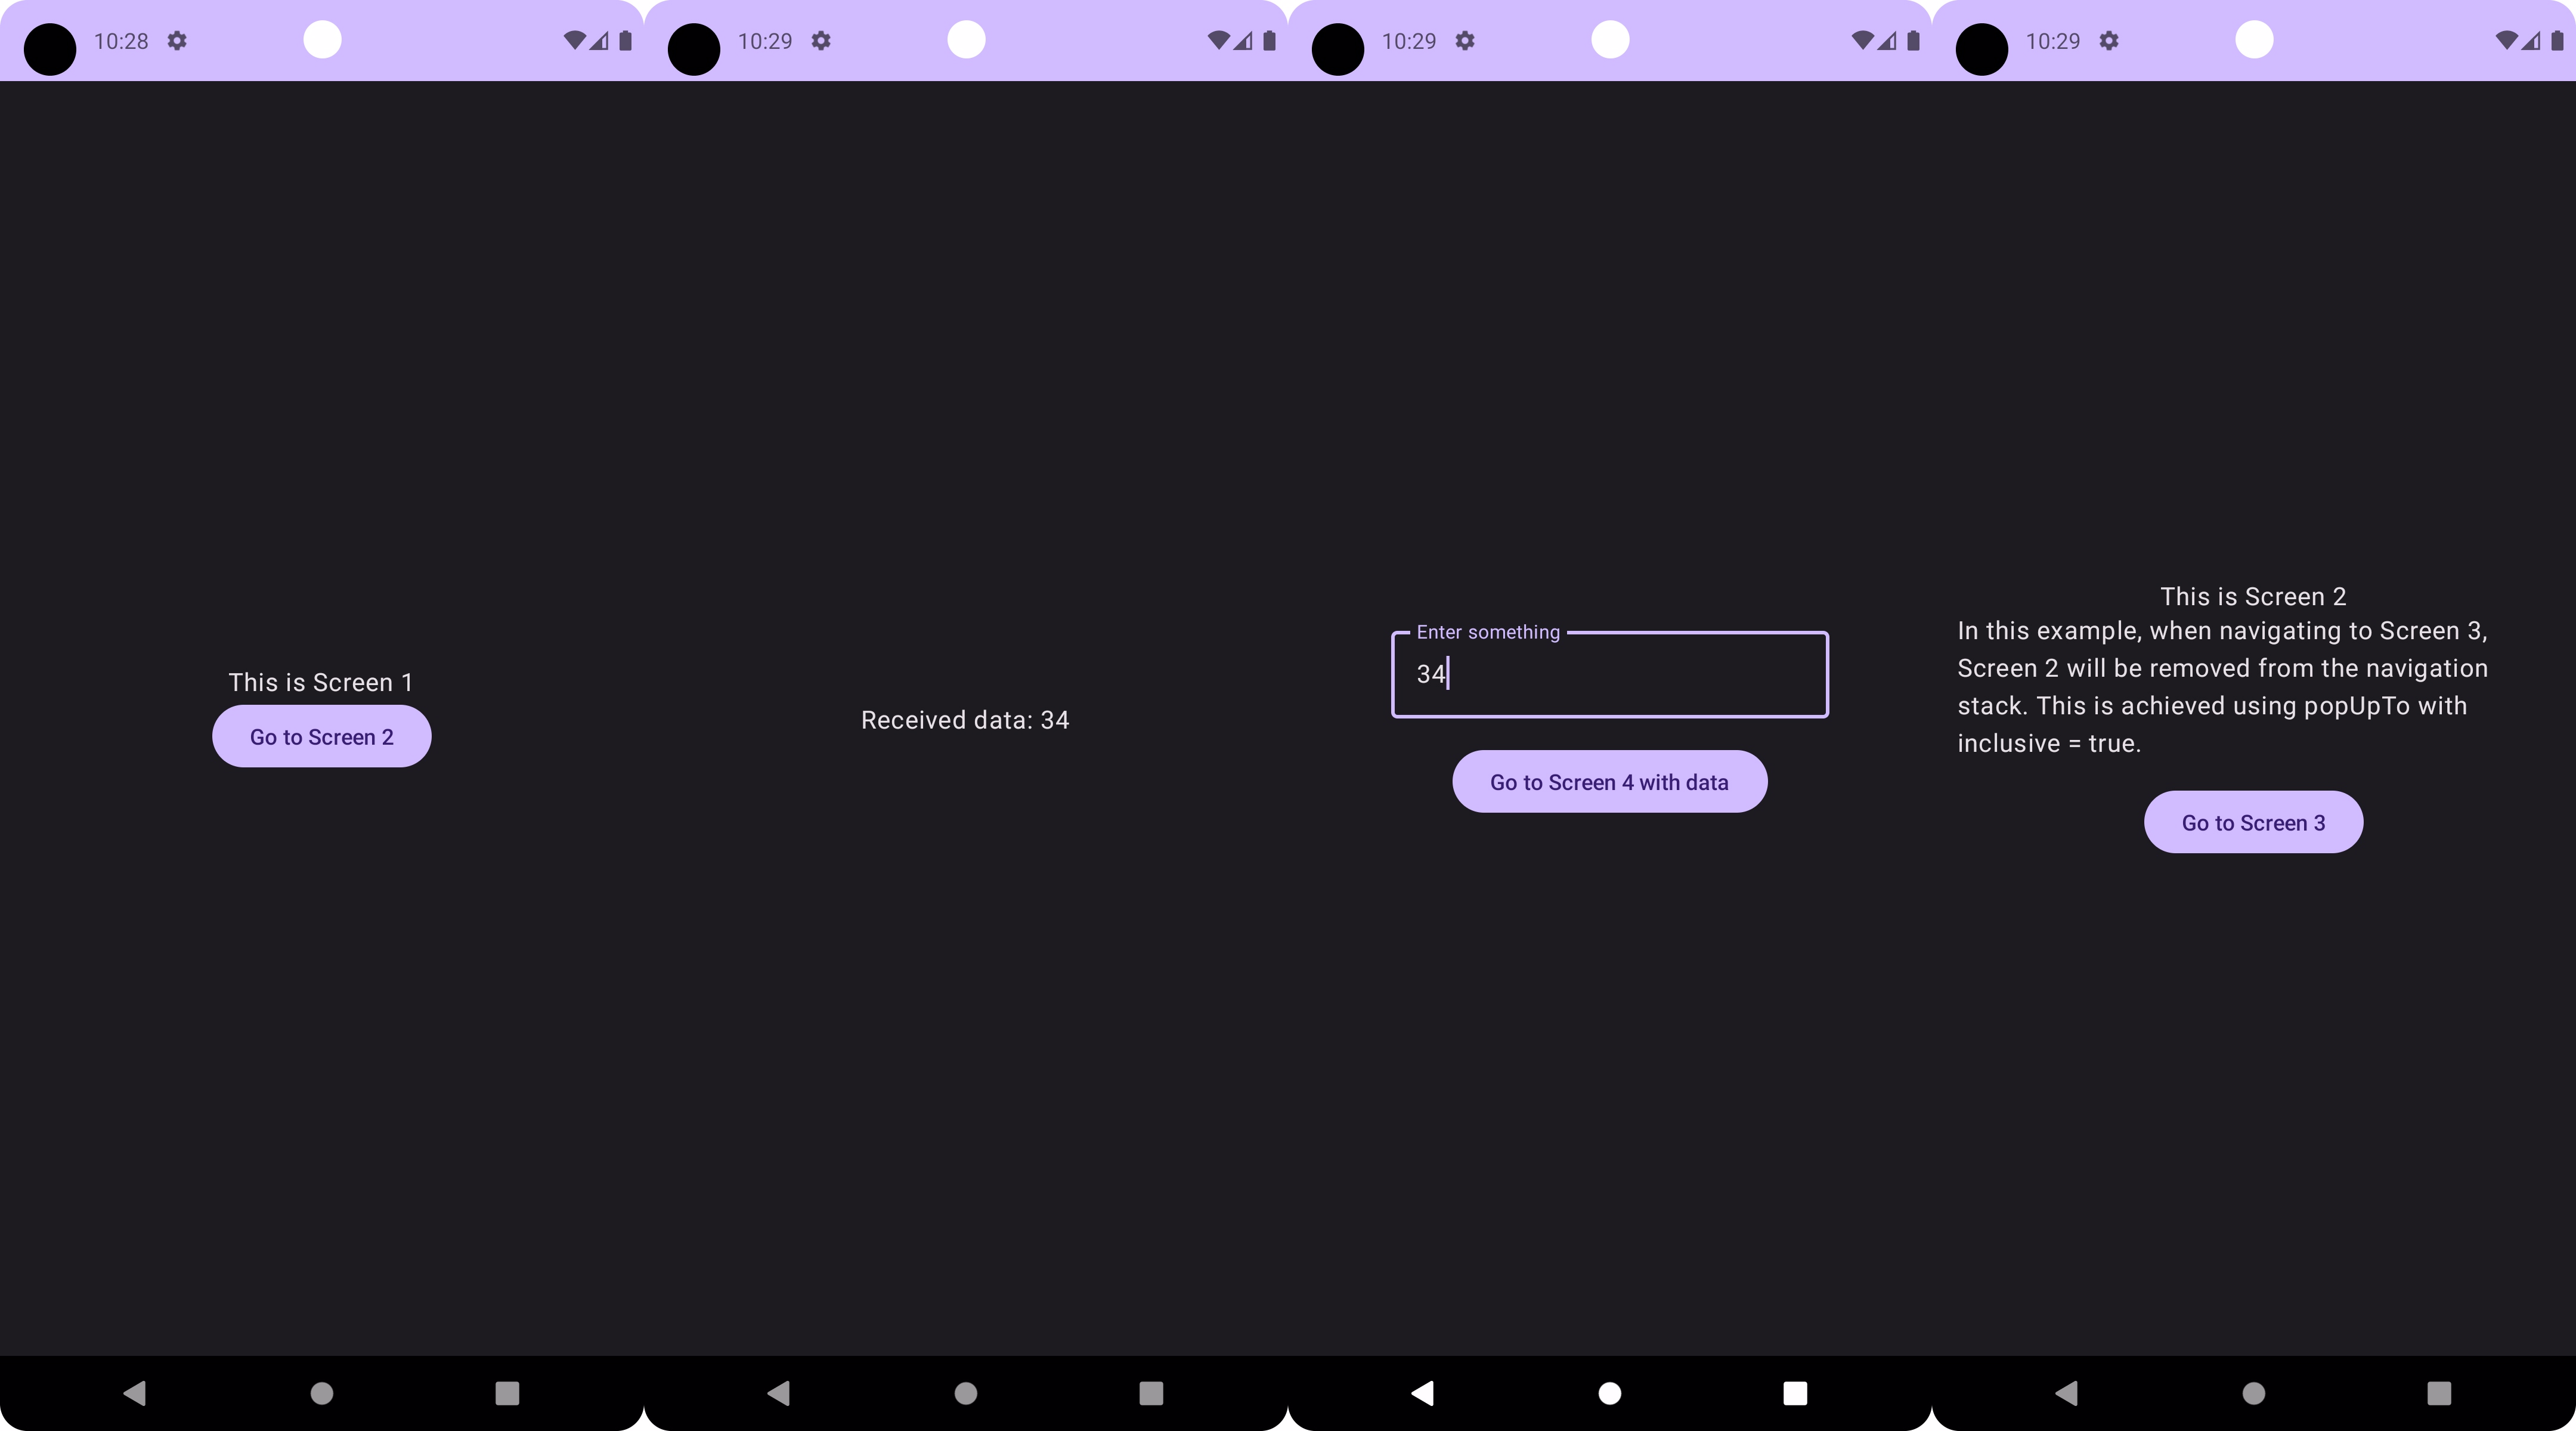
Modifying Screen2 to Demonstrate Removing a Screen from the Back Stack:
Screen2 to navigate to Screen3 and remove Screen2 from the stack. This means when the user presses the back button on Screen3, they won't return to Screen2 but to Screen1 instead.Practical Example and Explanation:
Here's how you can modify Screen2:
@Composable
fun Screen2(navController: NavController) {
    Column(
        modifier = Modifier
            .fillMaxSize()
            .padding(16.dp),
        horizontalAlignment = Alignment.CenterHorizontally,
        verticalArrangement = Arrangement.Center
    ) {
        Text("This is Screen 2")
        Button(onClick = {
            navController.navigate("screen3") {
                // This will remove Screen 2 from the stack
                popUpTo("screen2") { inclusive = true }
            }
        }) {
            Text("Go to Screen 3")
        }
    }
}
In this code:
When the button is clicked, navController.navigate("screen3") is called to navigate to Screen3.
The popUpTo("screen2") { inclusive = true } part is crucial. It means that when navigating to Screen3, Screen2 will be removed from the navigation stack (inclusive = true makes sure the current screen is also removed).
As a result, if the user presses the back button on Screen3, they will be taken directly back to Screen1.
This technique is particularly useful in scenarios like a login flow, where you don't want the user to return to the login screen after logging in. In the next section, we'll explore how to pass data between screens, further enhancing the capabilities of your navigation setup.
Section 4: Passing Arguments Between Screens
One of the powerful features of Jetpack Compose Navigation is the ability to pass data between screens. This is essential for scenarios where you need to carry information from one screen to another, such as passing a user's choice or a specific item ID.
The Concept of Passing Arguments in Navigation:
In Jetpack Compose Navigation, you can pass arguments between composables by including them in the route string.
These arguments are then retrieved in the destination composable.
Modifying Screen3 to Include a TextField for Input:
Screen3 to include a TextField where the user can enter some data. This data will be passed to Screen4.Creating Screen4 to Receive and Display the Passed Data:
Screen4 will be designed to receive this data and display it.Setting Up Argument Passing in the Navigation Graph:
Code Walkthrough and Explanation:
Modifying Screen3:
@Composable
fun Screen3(navController: NavController) {
    var text by remember { mutableStateOf("") }

    Column(
        modifier = Modifier
            .fillMaxSize()
            .padding(16.dp),
        horizontalAlignment = Alignment.CenterHorizontally,
        verticalArrangement = Arrangement.Center
    ) {
        OutlinedTextField(
            value = text,
            onValueChange = { text = it },
            label = { Text("Enter something") }
        )

        Button(onClick = { navController.navigate("screen4/$text") }) {
            Text("Go to Screen 4 with data")
        }
    }
}
In Screen3, we've added an OutlinedTextField for user input. The Button now navigates to Screen4, passing the entered text as part of the route.
Creating Screen4:
@Composable
fun Screen4(navController: NavController, data: String) {
    Column(
        modifier = Modifier
            .fillMaxSize()
            .padding(16.dp),
        horizontalAlignment = Alignment.CenterHorizontally,
        verticalArrangement = Arrangement.Center
    ) {
        Text("Received data: $data")
    }
}
Screen4 is designed to accept a String parameter data and display it.
Updating the Navigation Graph:
@Composable
fun AppNavigation() {
    val navController = rememberNavController()
    NavHost(navController = navController, startDestination = "screen1") {
        // ... other composables
        composable("screen4/{data}", arguments = listOf(navArgument("data") { type = NavType.StringType })) { backStackEntry ->
            Screen4(navController, backStackEntry.arguments?.getString("data") ?: "")
        }
    }
}
In the navigation graph, we define a route for Screen4 that includes a placeholder for the data argument. The navArgument specifies that data is a String.
This setup demonstrates how to pass simple data between screens in Jetpack Compose. It's a fundamental technique for creating interactive and dynamic user experiences in your apps.
Adding full code also Code available on Github :
Github Compose Navigation Full Code Repository.
MainActivity.kt:
package com.saurabhjadhavblogs.myapplication

import android.os.Bundle
import androidx.activity.ComponentActivity
import androidx.activity.compose.setContent
import androidx.compose.foundation.layout.fillMaxSize
import androidx.compose.material3.MaterialTheme
import androidx.compose.material3.Surface
import androidx.compose.material3.Text
import androidx.compose.runtime.Composable
import androidx.compose.ui.Modifier
import androidx.compose.ui.tooling.preview.Preview
import com.saurabhjadhavblogs.myapplication.ui.theme.ComposeNavigationExampleTheme

class MainActivity : ComponentActivity() {
    override fun onCreate(savedInstanceState: Bundle?) {
        super.onCreate(savedInstanceState)
        setContent {
            ComposeNavigationExampleTheme {
                // A surface container using the 'background' color from the theme
                Surface(modifier = Modifier.fillMaxSize(), color = MaterialTheme.colorScheme.background) {
                    AppNavigation()
                }
            }
        }
    }
}
AppNavigation.kt:
package com.saurabhjadhavblogs.myapplication

import androidx.compose.runtime.Composable
import androidx.navigation.NavType
import androidx.navigation.compose.NavHost
import androidx.navigation.compose.composable
import androidx.navigation.compose.rememberNavController
import androidx.navigation.navArgument
import com.saurabhjadhavblogs.myapplication.composables.Screen1
import com.saurabhjadhavblogs.myapplication.composables.Screen2
import com.saurabhjadhavblogs.myapplication.composables.Screen3
import com.saurabhjadhavblogs.myapplication.composables.Screen4

@Composable
fun AppNavigation() {
    val navController = rememberNavController()
    NavHost(navController = navController, startDestination = "screen1") {
        composable("screen1") { Screen1(navController) }
        composable("screen2") { Screen2(navController) }
        composable("screen3") { Screen3(navController) }
        composable("screen4/{data}", arguments = listOf(navArgument("data") { type = NavType.StringType })) { backStackEntry ->
            Screen4(navController, backStackEntry.arguments?.getString("data") ?: "")
        }
    }
}
Screens.kt
package com.saurabhjadhavblogs.myapplication.composables


import androidx.compose.foundation.layout.*
import androidx.compose.material3.Button
import androidx.compose.material3.ExperimentalMaterial3Api
import androidx.compose.material3.OutlinedTextField
import androidx.compose.material3.Text
import androidx.compose.runtime.Composable
import androidx.compose.runtime.getValue
import androidx.compose.runtime.mutableStateOf
import androidx.compose.runtime.remember
import androidx.compose.runtime.setValue
import androidx.compose.ui.Alignment
import androidx.compose.ui.Modifier
import androidx.compose.ui.unit.dp
import androidx.navigation.NavController

@Composable
fun Screen1(navController: NavController) {
    Column(
        modifier = Modifier
            .fillMaxSize()
            .padding(16.dp),
        horizontalAlignment = Alignment.CenterHorizontally,
        verticalArrangement = Arrangement.Center
    ) {
        Text("This is Screen 1")

        Button(onClick = { navController.navigate("screen2") }) {
            Text("Go to Screen 2")
        }
    }
}

@Composable
fun Screen2(navController: NavController) {
    Column(
        modifier = Modifier
            .fillMaxSize()
            .padding(16.dp),
        horizontalAlignment = Alignment.CenterHorizontally,
        verticalArrangement = Arrangement.Center
    ) {
        Text("This is Screen 2")

        // Explanation Text
        Text("In this example, when navigating to Screen 3, " +
                "Screen 2 will be removed from the navigation stack. " +
                "This is achieved using popUpTo with inclusive = true.")

        Spacer(modifier = Modifier.height(16.dp))

        Button(onClick = {
            navController.navigate("screen3") {
                // This will remove Screen 2 from the stack
                popUpTo("screen2") { inclusive = true }
            }
        }) {
            Text("Go to Screen 3")
        }
    }
}

@OptIn(ExperimentalMaterial3Api::class)
@Composable
fun Screen3(navController: NavController) {
    var text by remember { mutableStateOf("") }

    Column(
        modifier = Modifier
            .fillMaxSize()
            .padding(16.dp),
        horizontalAlignment = Alignment.CenterHorizontally,
        verticalArrangement = Arrangement.Center
    ) {
        OutlinedTextField(
            value = text,
            onValueChange = { text = it },
            label = { Text("Enter something") }
        )

        Spacer(modifier = Modifier.height(16.dp))

        Button(onClick = {
            navController.navigate("screen4/$text")
        }) {
            Text("Go to Screen 4 with data")
        }
    }
}
@Composable
fun Screen4(navController: NavController, data: String) {
    Column(
        modifier = Modifier
            .fillMaxSize()
            .padding(16.dp),
        horizontalAlignment = Alignment.CenterHorizontally,
        verticalArrangement = Arrangement.Center
    ) {
        Text("Received data: $data")
    }
}
Thanks For Reading Keep composing :).